 How to Bind Books – The art of bookbinding is very old and the modern processes of putting pages into book from have changed little over the years. The sheets of paper are folded in the same way and the manner of fixing the folios into the covers is still done as it way in our grandfather’s time. Let us try our hand at this art, it is quite simple with few snags, and you will soon be able to prepare a presentation copy of your own work as a personal gift for a friend.
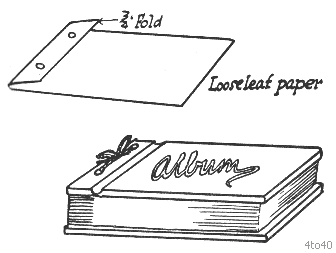
This is probably one of the most useful of gifts and is acceptable to any boy. You can make a really attractive and more artistic album by following the few simple instructions and studying the diagrams. You will need two stiff pieces of cardboard for the covers, a number of loose leaf sheets for the inside of the album, and ribbon to tie the covers. First of all, cut two pieces of cardboard to a size to suit yourself. Make it about ¼ in. larger than the loose leaf sheets, round each side.
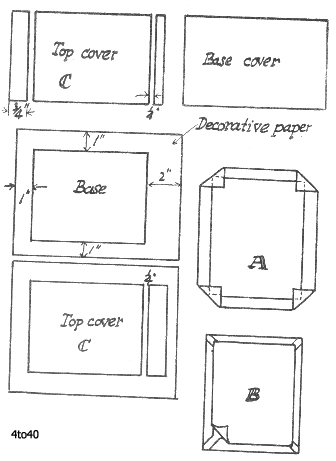
Now lay these two sheets of cardboard on a pile of old newspapers and cut out the shapes illustrated. You will notice that one of the sheets has a ¾ in. piece cut off, also a ¼ in. strip. This is for the top of the cover and will form the hinge. The ¼ in. strip is discarded and the width is made up by laying the two pieces flat, leaving a ¼ in. space. See the diagram C.
The next step is to cover with decorative paper, wallpaper or a designed wrapping paper. Lay this paper flat and place your two pieces of cardboard on these as shown, leaving I in. round the sides and 2 in. at the top for one cover and the ¼ in.gap on the other. Trace round the pieces of cardboard with your pencil and take off the card. Paste all over the cover paper, making sure that the design is on the underneath side, and carefully lay the pieces of card in position on your pencilled lines. You will find it easier to do one board at a time.
Now fold over the corners of the cover paper as illustrated and press down into position with clean paper. Do the pasting as quickly as possibly so that the paste does not dry. To complete the covers, apply the lining paper to go over the inside of each cover, A. For this, it is advisable to use an attractive decorative paper and cut each sheet so that there will be a ¼ in. space all round. Paste the two inside papers to the covers, putting them on quite central so that you will have the effect illustrated, B.
 Put a sheet to waxed paper between the covers and press between two pieces of wood, with books on top. One point that is most important for the finish of the covers, is to make sure that you have no air bubbles or creases in your covers. Rub down over the hings, the flat surfaces and the insides, so that all is smooth and does look good. A little extra care in this direction will make all the difference in the finished appearance of your book cover.
When quite dry, remove the covers from the press and mark the position of two holes with your pencil, to coincide with the holes in the loose leaf paper. These two holes can be punched through the covers by hammering a nail through them, smoothed off afterwords with a little sandpaper.
Having completed the covers for your album, you can next prepare the loose leaf paper for this. You can use coloured paper of a fairly stout quality, actually it is called “cover paper” and can be bought at art material shops. Cut each sheet so that it is ½ in. less in depth than the covers and I in. longer than the album covers.
Make a ¾ in. fold at the left hand side of each sheet and place the folded end flush with the left hand edge of the covers. This will mean that the covers will over lap ¼ in. on the three other sides. Mark the position of the punched holes in the cover and remove the loose leaf sheets and carefully punch the two holes through the sheets.
You will now have your album all ready for assembling. Use either a coloured ribbon or a shoe lace to thread through the two holes and tie into a neat bow, as shown in the diagram. Your photograph album is now ready for you to place your snaps. If you prefer a glossy finish, the outside covers of the album can be varnished to give this effect.