A Flying Scale Model Aeroplane
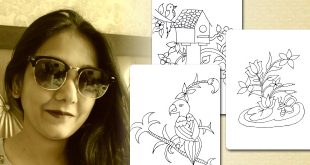
The little aeroplane has been specially designed for this activity for easy construction and cheapness, and is a 3/8 inch to the foot scale model of the D.H. Moth Minor. The original model has been properly tried out and has won admiration for its pretty flying. Its looks can be judged from the photograhs, Fig I.
Best way to start the job is to trace out the parts in Fig. 2 and 3 on to some tracing or greaseproof paper and carefully cut these out. Use these pieces of paper as patterns for cutting out the balsa sheet. This cutting out is best done with a razor blade broken across the corner to leave a sharp point, and held in a handle of some sort. This is shown in fig. 4.
The parts forming the fuselage, wing, tailplane, and fin, should be cut from 1/64 inch sheet balsa and covered on both sides with Japanese tissue paper. Use Grip Fix or Bond Fix or some similar photographic paste and smear it all over the balsa one side at a time, and gently lay on the tissue paper. Press it in the middle and smooth it out towards the edge. Avoid wrinkles, but if you do get any press them out with the back of your finger nail. Leave about half an hour to dry and then trim the edges with a razor blade. The fuselage formers marked 2, 3, 4 should be made by sticking two pieces of 1/64 inch balsa sheet together with the grains crossing to form two ply. Use quick drying balsa cement or glue, and make sure they are well stuck all over. The former marked 1 should be made from two pieces of 1/32 inch or four pieces of 1/64 inch balsa. Cut them out carefully with a razor blade, and if you should break one just stick it together again. The first thing to start building is the fuselage. Make both sides the same width by sandpapering or trimming with a razor blade, and stick in the front and rear formers. Keep both sides level by standing them on pieces of wood or something like matchboxes. Leave about ten minutes to dry and then put some glue on the edges of formers 2 and 3 and slip them into place separating the fuselage sides with your fingers. Fig. 5 shows the fuselage set up for this.
Now you can make a start on the wing. Glue a strip stout paper about 1/8 inch wide along the outside edges of the centre portion of the wing so that it overlaps 1/16 inch and glue a wing rib underneath.
Pin it down to a flat board for about 10 minutes and then put on the outer portions of the wing, sticking the rear two-thirds first with the tips held up ¾ inch on blocks of wood or something similar, and then the front edge is glued down. See Fig. 6. Note that the front edge is straight and the rear edge slopes forwards towards the tips. With the fuselage still on the blocks, put some glue on the cut away portion and lay the wing in place (upside down). See that it is quite level while the glue dries.
Next put on the fuselage sides marked 4 and 5. The ends marked 4 are glued to the fuselage sides at former 4 and the ends marked 5 are struck together. Keep the top of them level with the top edges of the fuselage and then put on the tailplane. Be sure to keep it level while the glue dries.
The next thing is the decking on top of the fuselage and you can start with the cockpit cover. Bend this carefully round a rod such as the handle of a wooden spoon to curve it without letting it crack, put some glue on the top of former 2 and 3 and along the top edges of the fuselage sides and put the cover in place. Hold it with your fingers while the glue sets. Now do the same with the top engine cowling, butting the rear edge up to the front of the cockpit cover. The rear fuselage top is made from stout paper and is put on the same way. The point of it should just match up with the tail end of the fuselage. Smear some glue along the inside edges of the fin and out that on, making sure it is quite upright while the glue dries. Put in the fuselage sides just under the wing, the fuselage bottom and the engine cowling bottom. While doing this take special care to keep the wing and tail plane level. The triangular piece under the tail is left open for putting in the rubber motor. The tail skid can be added and also the windscreens. These are cut from celluloid, such as old photographic film, and are fixed in place by gluing the curved edge to the front edge of the cockpit opening. The Wheels for the undercarriage are ½ inch diameter celluloid of the “balloon” type, and the axle is an ordinary pin pushed through, bent at right angles, then backwards and again upwards as shown in Fig. 7.
The legs are made from two pieces of 1/16 inch balsa (or the same thickness made from 1/64 inch) glue together with the pin in between and sandpapered to a streamline shape. The outside half is cut shorter than the inside to clear the wing rib to which the leg is glued. The centre of the leg should be ½ inch behind the leading edge of the wing and slope forward ¼ inch at the bottom, see Fig 8. Cut the nose block from two pieces of 1/16 inch balsa (or the same in 1/64 inch) to the two shapes shown in Fig. 3 and glue them together. A small brass bush, the sort with a nut is best is then put in. A 4 inch diameter balsa propeller is used and is best bought. Instead of this propeller and nose block you can use a “Frog” gearbox and propeller, in which case you get much the same flight, but a little better looks. The Propeller shaft is made from 24 S.W.G steel wire bent as shown in Fig. 9. Make the rubber hook first, thread on the nose block, then a “cup” washer and the propeller and finally bend the wire round the propeller.
The motor is made from 1/8 inch strip rubber and when using the gearbox you want 6 strands 6 inches long that is one yard of rubber. Without the gearbox you will want 4 strands 6 inches long. The two ends are tied together with a reef knot and the ends bound with thread forming on large loop which is folded into the number of strands required. Put one end on a match stick and wind on a small rubber band to keep it in place. Now cut the match to a length of 1/2 inch. Before use the motor must be lubricated with proper rubber lubricant. To put the motor in fuselage it is best to make a wire hook about 8 inches long, poke it through the fuselage from the nose and pull the motor through.
To finish of you can paint the model with any attractive colour you like. Now for flying the model. First hold the model up and look squarely on the nose. The tailplane and fin should appear as two thin lines at right angles. Now look at the wing and you should see the leading edges sloping up each side. The trailing figure should appear below the leading edge at the middle, sloping up evenly each side to the same level as the leading edge at the tips, see fig 10. If the things are not quite right you can twist and bend them into place with your fingers. Hold the model just behind the wing and throw it like a dart, only gently, downwards. Try two or three times, perhaps more slowly, perhaps faster, and see how the model behaves. It may try to put its nose up in the air to much, and then perhaps fall on its nose. If it does this when you throw it hard but not slowly there is not much to worry about, but if it does it when you throw slowly it wants some weight heading to the nose. This can be little bits of lead, short or even
Silver paper rolled up and glued just inside the nose. If the model will not rise at all even when thrown fairly hard, tip the rear edges of the tailplane up a bit. Trim the model this way until it gives a nice glide, then wind it up a bit and try again.
It will fly well but may try to loop. If so put some packing in the top of the nose block to tilt the propeller downwards as shown in fig 9. What you need most for success with any model aeroplane is care and patience, and if you have these you will have a fine little flyer.